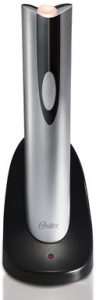
I was handed an Oster Cordless Rechargeable Electric Corkscrew with a broken front button. The button is secured by two arms with retainer pins, creating an axis on which the button swivels, enabling forward and reverse operation of the device. While the device itself is a $30 item, so easily replaceable, and the hour or two it took to design, refine and install a 3d printed replacement is probably not justified, once designed I felt it was worthwhile to post the replacement button, because the installation itself took less than 10 minutes so might be justifiable, for anyone else experiencing the same problem – that being likely the most common mode of failure for these devices.
If you find yourself with one of these electric corkscrews with broken button pins, feel free to download and print this replacement button (material cost $0.16 in PLA). While it may appear that you can install the button from the frond that properly compressing the arms to get the pins aligned for proper insertion to be a daunting process, so I elected to disassemble the unit and install the button from the back (inside) of the case. First, move the two sets of rubber nubs from the back side of the old button, to the new button, inserting the nubs into the target holes on the new 3D printed button, that match those on the original button. These rubber nubs are critical to proper operation of the device switch once the button has been installed.
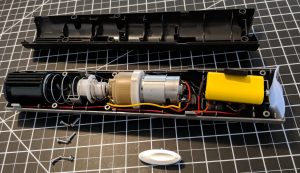 Now disassemble the corkscrew, separating the clamshell case, taking care to contain the large spring that preloads the corkscrew actuator at the base of the unit. There are several individual parts that comprise that element of the unit, so to save time, try to keep them arranged on the corkscrew shaft in the proper order, so as to avoid reassembly hastles. You will need to remove the motor from the switch side
 of the clamshell, and unscrew the switch PCB from the inside of the housing, in order to install the new switch button, but that installation will be quite straight forward, and the button pins willswivel freely in holes in the metal/plastic arms associated with the switch PCB. Screw down the switch PCB completely, which will provide compression against the underside of the button, securing it in place. Reinstall the motor in the switch-side of the clamshell c
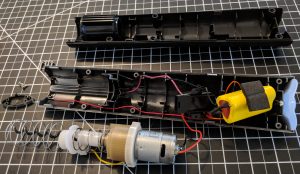
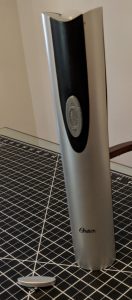 ase, compressing the large actuator spring, which will be held in place by the baffles built into the the clamshell. Align and secure the opposite side of the clamshell with the case screws, and you should once again have a fully operational electric corkscrew.